Showing posts with label Meatless Monday. Show all posts

10.10.2016

Review of Blue Apron

If you don’t know what Blue Apron is, it’s a box subscription service that provides ingredients and recipes to make delicious meals at home.  The box comes right to your door with exact amounts of ingredients so cooking new recipes is fun and easy.  I did have a coupon code so the first box was free and decided to try it out for the sake of this blog (and to try some yummy dinners along the way.)  Right now you can get 3 free meals when you sign up.
In my first box I was sent Paprika Shrimp & Cheddar Grits, Sweet Corn Ditali Pasta and Spicy Eggplant Curry & Green Bean Curry.  


Isn’t there a lot of packaging?
There is quite a bit of packaging to ensure that soft vegetables arrive in good condition.  Everything provided is also labeled for your convenience.  On the upside, there is little to no food waste since everything is measured and provided in exact quantities.

Are the recipes healthy?
The recipes provided did range around 700-800 calories for one portion which is higher than I personally would like to see my home-cooked meals however, the portions are really large and I never ended up eating half of the recipe.  I actually had enough for about 3 servings which means the calories were closer to about 500 per serving. 

I don’t eat _____.  Can I still use Blue Apron?
You have the option to choose recipes that include meat, chicken, fish or vegetarian options.  I chose the fish and vegetarian option which gave me a variety of one shrimp recipe and two meatless recipes.

But I’m not that great at cooking.
Blue Apron makes it extremely easy to follow along with their recipes and provides tips on how to prepare your meal.  Everything is labeled and measured out in exact portions so preparation is a breeze.  It would also be really fun to share the cooking experience with another person and the result is a new recipe you may not have ever tried before.

Does it save time?
I recommend reading the recipe over from beginning to end before starting to cook.  My first recipe took me a long time to cook for example, because I cut up all vegetables then started boiling water for pasta after.  Normally, I would start boiling water and cooking pasta at the same time as prepping all the veggies.  If you are new to cooking or can get overwhelmed with doing several things at once, go ahead and follow the recipe step by step.  If you are a little more confident, take note of things that you could do simultaneously.  In the end, Blue Apron saves you time since you aren’t spending time grocery shopping for that meal.

Is it expensive?
The price can seem steep at first however, you are getting enough ingredients for 6-8 meals (if you choose the 2 person option).  I normally cook at home during the week and tend to eat out on the weekends which can get pricey.  My box was delivered on Thursday evening so I had meals to last me through the entire weekend and prevented me from spending even more money at restaurants.  The recipes are delicious so I was actually looking forward to my dinners that weekend and didn’t feel the need to order out.

Overall, I think Blue Apron would be great to occasionally spice things up in the kitchen if you are getting tired of the same old recipes week after week. It would definitely be fun to make as a couple or with someone else and makes more sense I think for families with 2-4+ members.  The recipes were delicious and fun to make but for me personally, it was a lot of dirty dishes for just one person's meal.  I may try it again in the future, though!


*All opinions are my own and I was not compensated for my review.

8.31.2016

Lentil Taco Salad

This meatless version of taco filling is the perfect topping for any taco salad.  However, the inspiration behind this recipe was from some lentil quesadillas I made a few years ago in a cooking class I lead for 9 and 10 year olds.  They loved them and so did I!  
For this recipe you can most definitely prepare dried lentils according to their packaging however, I am but one person and can't really rationalize making a whole batch of lentils for just me.  Plus, using canned lentils speeds up the process tenfold and who has time for that during the work week?  
I will definitely be making this recipe again and again for an endless string of vegetarian/Mexican dinners!


Lentil Taco Salad
Recipe by Ali Caron
Makes 4-6 servings

Ingredients:
Taco Filling:
1 tablespoon olive oil
1 shallot, chopped
1-2  medium carrots, chopped
2 cloves garlic, chopped
1 can low sodium lentils
1 tablespoon taco seasoning (or combine smoked paprika, chili powder and/or Sriracha to taste)

For Salad:
Lettuce
Tomatoes
Shredded cheese
Greek yogurt

Directions:
Add olive oil, shallots and carrots to medium saucepan over low-medium heat.  Stirring frequently, cook until tender.  Add garlic, lentils and seasonings and stir until heated through.  Use filling to top salads, tacos or quesadillas.
To prepare salad, add lettuce to bowl.  Top with about 3/4 cup lentils, shredded cheese, chopped tomatoes and a dollop of Greek yogurt.  Enjoy!

8.17.2016

Mini Fruit Pizzas!

Sometimes at family gatherings I am put in charge of dessert and I never know quite what to make, although I do always try to incorporate fruit into the mix.  For this recipe, I decided to use pre-made cookie dough for two reasons; 1) it’s easier and 2) the cookies come out symmetrical.  Since the cookies and frosting are slightly sweet, tart berries and mint pair nicely together for a light and refreshing treat.  Not to mention how gorgeous they look, with each cookie decorated slightly different and a touch of green. 
To make things even easier, if possible, I prepared the cookies and frosting ahead of time.  I packed them up separately in Tupperware and brought them along with the fresh berries and mint to my brother’s house and assembled them there since I wasn’t sure how well they would travel.  They were a hit and I’m sure they would be great for a kid’s party, too!


Mini Fruit Pizzas
Recipe by Ali Caron, RD

Ingredients:
1 package pre-made cookie dough

For the Frosting:
8oz cream cheese, softened
8 tablespoons butter, softened
1 teaspoon vanilla extract
½ cup powdered sugar

Fruit:
Berries such as strawberries, blueberries, raspberries and blackberries
Fresh mint leaves

Directions:
Prepare cookies as per instructions on package.  Allow to cool.
Beat together cream cheese and butter until fluffy.  Add in vanilla extract and powdered sugar and beat until smooth.
Once cookies are cool, spread about a tablespoon on each cookie and decorate with a few different types of berries.  Add one small mint leaf to all or most cookies.  Serve immediately.


Tip: Make ahead and store cookies and frosting in separate air tight containers.  Keep the frosting refrigerated.  Decorate when ready!

8.02.2016

Minestrone Soup

I considered waiting to post this recipe until it cooled off a bit weather-wise but it's just too good not to share!  And so easy!  I find chopping vegetables therapeutic (it's one of my favorite things to do, is that sad?) and there is something so comforting about making a big pot of soup.  While making soup may be something cozy to do during colder months, the vegetables this time of year are just so delicious and really make this soup stand out.  This vegetarian soup has something for everyone and is hearty enough to stand on it's own.  I prefer to make my soups as low-sodium as possible and add just a touch of salt to taste at the end to really control how much salt I am getting, especially with the canned chickpeas, broth and tomatoes in this recipe, the sodium could really add up.  Serve it for dinner or bring it to work for lunch.  Your heart will thank you!


Minestrone Soup
Serves 10-12
Recipes by Ali Caron, RD

Ingredients:
2 Tbsp olive oil
1 cup celery, chopped
1 cup onion, chopped
1 cup carrots, chopped
1 small zucchini, chopped
2 cloves garlic, chopped
Salt and Pepper to taste
2 tsp dried oregano
1 can low sodium chick peas, drained and rinsed
2-3 cups low sodium vegetable broth
1 14.5oz can "no salt added" diced tomatoes
1 cup elbow macaroni
Optional: parmesan cheese

Directions:  In a large soup pot, heat olive oil over medium heat.  Add celery, onion and carrots and cook for about 5 minutes or until vegetables start to soften, stirring frequently.  Add zucchini, chick peas, garlic, salt, pepper and dried oregano and continue to stir for 1-2 minutes.  Add tomatoes, macaroni and 2 cup of vegetable broth to pot.  Stir, cover and let simmer for about 10 minutes.  Add another 1-2 cups of broth if needed.  Continue to cook for another 10 minutes or until vegetables and pasta are fork tender.  Serve and garnish with parmesan cheese.

Nutrition Facts: 139 Calories, 3.6g Fat, 23g Carbohydrate, 4g Protein, 4g Fiber, 364mg Sodium (or 497mg if added 1/2 tsp salt), 315mg Potassium


7.28.2016

Fresh Mint Iced Tea

I've been making my iced tea at home on the weekends this summer and this weekend the mint has really popped! I decided to simply add a couple handfuls along with some lemon slices to amp up the flavor and it was so worth it.  The result is a refreshing, calorie-free drink you can sip on without any of the guilt!  Plus, if you are not so into drinking plain water, you may really like this beverage.  This Fresh Mint Iced Tea is an easy way to serve a pretty drink for guests at any barbecue or summer gathering.  Cheers!


Fresh Mint Iced Tea
Serves 8-10
Recipe by Ali Caron, RD

Ingredients:
4 tea bags (peach, green, or white teas work best)
Two handfulls of mint
1 lemon, sliced into rounds

Directions:
Bring 4 cups of water to a boil.  Pour into a bowl that contain tea bags and let it cool for about 10 minutes.  Fill a serving pitcher about halfway with ice.  Pour cooled tea (with tea bags removed) into pitcher.  Add another 1-2 cups of tea if needed.  Add lemon slices and mint to pitcher and stir.  Serve immediately or the taste will only improve as it sits in the fridge for up to a week!

7.25.2016

Blueberry Galette - 2 Ways!

Hope you all are enjoying your summer!  This weekend I decided to get into the kitchen and do some baking since the humidity decided to give us a break on Sunday.  When I say baking though, I mean the really, really easy version of baking.  This pretty galette is so easy to assemble but looks gorgeous and rustic and is perfect for summertime gatherings.

I used pre-made pie crusts because let's be serious, it's summer and we all want to get back to being outside and enjoying the sunshine.  If you prefer to make your own pie crust, I'm sure it would taste even better and more power to ya!  I, however, have learned my lesson and have just embraced the fact that when it comes to baking, I can use all the help I can get.

Since the pre-made pie crusts typically come with two crusts, I used my left over blueberry mixture to make some individual galettes which are SO cute and easier to eat.  I think people tend to enjoy mini versions of things, like cupcakes, so they don't have to bother with a fork and can eat it in a few bites.

I will definitely be making this again, and the possibilities for fillings are endless!  I'm sure a peach or berry filling would be divine.  Let me know if you end up making this recipe and how you like it!  Happy Summer!


Blueberry Galette - 2 Ways!
Both Serve 6
Recipe by Ali Caron, RD

Ingredients:
1 pre-made pie crusts

3 cups fresh blueberries (For small galettes, only need 1 cup blueberries and a small amount of all other ingredients)
1/4 cup sugar
1 tablespoon flour
Zest of 1 lemon
1 teaspoon lemon juice
pinch of salt

1 egg, beaten
Sprinkle of sugar

Directions:
Preheat oven to 350 degrees Fahrenheit.

Line a pizza stone or baking sheet with parchment paper. Sprinkle with flour.  Unroll pie crust and place on parchment paper.

Combine blueberries, sugar, flour, lemon zest, lemon juice and salt in a medium bowl.

Gently pour mixture on top of pie crust, leaving about 2 inches around the edge empty.  Fold 2-3 inch sections of the crust over the blueberries and gently press together to seal.  Brush the edges of the crust with egg wash and sprinkle with sugar.

Bake for 30-45 minutes or until all the edges are golden brown.  Allow to cool on stone for 20-30 minutes before serving.

For individual galettes (Yields 4-6): Preheat oven to 350 degrees Fahrenheit.  Line pizza stone or baking sheet with parchment paper and sprinkle with flour.  Cut pie crust into 4-inch rounds using a biscuit or cookie cutter and place on lined pizza stone. Spoon 1-2 tablespoons of the blueberry mixture onto each crust and gently fold in sides, pinching folds together to seal.  Brush the edges of the crust with egg wash and sprinkle with sugar.  Bake for 20 minutes, or until edges are golden brown.  Allow to cool for 15-20 minutes before serving.

Nutrition Facts: (For 1/6th large galette or 1 small galette) 221 Calories, 9g Fat, 36g Carbohydrate, 1.5g Protein, 2g Fiber, 211mg Sodium, 68mg Potassium

4.26.2016

Salmon Burgers with Mango Salad

I've made a few versions of salmon burgers before but this by far is my favorite.  Topping these juicy, delicate burgers with avocado, mango and cucumber adds a light and crunchy pop of flavor.  The mango's sweetness and the creaminess of the avocado pair perfectly with salmon. You can pop this between two buns or on top of half an English muffin for a more well rounded meal but if you are looking for a lighter dish enjoy this one as is or on top of a bed of lettuce.  As the temperatures heat up, these salmon burgers will definitely be my go-to instead of the tired ol' veggie burger.
See you all back here soon!


Salmon Burgers with Mango Salad
Recipe by Ali Caron, RD
Serves 4

Ingredients: 
Salmon Burgers:
10 oz fresh salmon
1 shallot, minced
1/4 cup shredded parmesan cheese
1/4 cup Panko breadcrumbs
1 egg white
1/2 tsp garlic powder
1/2 tsp dill
salt and pepper to taste

Mango Salad:
1/2 cup diced cucumber
1/2 cup diced mango
1/2 cup diced avocado
splash of lime juice
1/4 tsp dried parsley
pinch of salt

Directions:
Cut salmon into 1-2 inch cubes.  Add salmon and all other burger ingredients into food processor.  Grind until fully combined.  Divide mixture evenly into four balls and form patties with hands.  Place in the refrigerator for 20 minutes to set.
Meanwhile, combine all ingredients for mango salad in a small bowl and mix well. Set aside.
Place patties on greased pan or surface over medium heat.   Cook on each side for 5-10 minutes, or until golden brown.  Serve topped with mango salad.

Nutrition Facts: (1 Burger with 1/3 cup Mango Salad) 236 Calories, 12.5g Fat, 13g Carbohydrate, 19g Protein, 2.5g Fiber, 193mg Sodium, 445mg Potassium

4.11.2016

Cocoa-nut Energy Bites

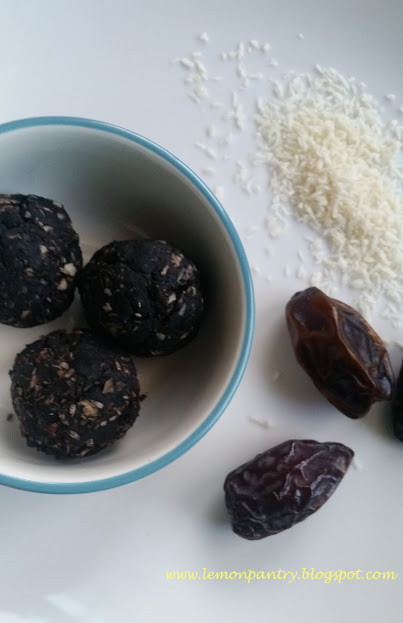
Okay guys, this recipe was really fun to make, if you don't mind a little mess!  These Cocoa-nut Energy Bites are my take on Medjool Date Power Balls from NaturalDelights.com.  It's almost impossible to believe healthy these bites are because they taste just like No-Bake cookies.
I had never even tried a date before making this recipe and I was pleasantly surprised.  They are sweet and gooey and taste almost like caramels (YUM). Dates are little powerhouses that boast high numbers of potassium, fiber and iron.  You can't go wrong with this recipe, but feel free to play around with other ingredients!  I think this would be especially fun to make with children, too.
I bet you can't eat just one, although they are surprisingly filling and make a perfect snack.
See you back here soon!


Cocoa-nut Energy Bites
Recipe by Ali Caron, RD
Makes about 12 balls (6 servings)

Ingredients:
1 cup sliced almonds
16 Medjool dates, pitted
2 tablespoons water
1/2 cup organic shredded coconut
1 tablespoon (low sodium) peanut butter
3 tablespoons cocoa powder
1 teaspoon cinnamon

Directions: 
Place 1 cup almonds in food processor and pulse until ground.  Place almonds in a medium bowl.
Place pitted dates in food processor along with a few tablespoons water and blend until smooth.  Add to bowl.  Add coconut, peanut butter, cocoa powder and cinnamon to bowl.  Combine well with fork (or use your hands).
Scoop about 2 tablespoons into your hands and roll to form a ball.  Place on parchment lines baking sheet and place in refrigerator for about 30 minutes.  Store in air-tight container in the refrigerator until ready to serve.

Nutrition Facts: (2 Bites) 138 Calories, 12g Fat, 7g Carbohydrates, 5g Protein, 4g Fiber, 9mg Sodium, 209mg Potassium

2.22.2016

Cayenne Sweet Potato Tacos

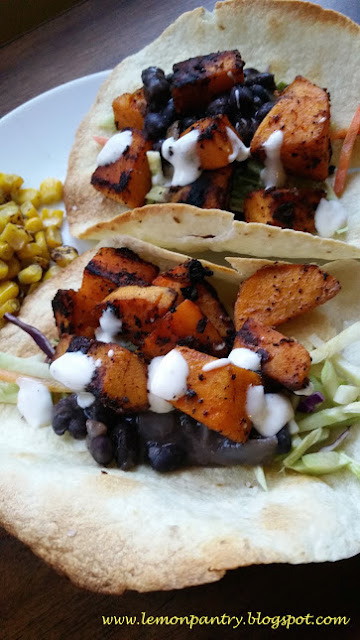
Several weeks ago, I travelled to Brunswick, ME for the last of my post-op appointments following my foot surgery.  I absolutely fell in love with the vibe of the downtown area and after my appointment I stopped at the Little Dog Coffee Shop for a latte to gear up for the 2 hour trip home.  I then stopped into Big E's, a local burrito joint that had some great reviews.  I opted for a veggie burrito bowl with cayenne sweet potato and I honestly now think that is the key ingredient that every burrito place should have.  It was fantastic!  The sweet and spiciness complimented the black beans so well and left me satisfied without feeling like I had overdone it.
A week or so after my trip I decided to recreate the dish in a taco version.  I can't believe how easy it was and again, how delicious it tasted.  I highly recommend you try making it for someone, they won't be disappointed!


Cayenne Sweet Potato Tacos
Serves 2 (makes 4 tacos)
Recipe by Ali Caron, RD

Ingredients:
1 Tbsp Olive Oil
1 Sweet Potato
1/2 - 1 teaspoon cayenne pepper
1 shallot, diced
Salt and Pepper to taste

1 cup black beans
1 cup chopped greens or slaw mix
Olive oil spray
4 flour tortillas
Drizzle of ranch dressing

Directions: Wash and chop sweet potato into 1 inch cubes.  Heat oil in medium skillet and add sweet potato.  Cook on low-medium heat for about 5 minutes stirring occasionally.  Add shallots, cayenne pepper, salt and pepper and stir until evenly coated.  Finish cooking for another 5-10 minutes, or until fork tender.
Meanwhile, heat black beans on stove top or in microwave.  To heat tortillas, spray each with olive oil non-stick spray and heat in toaster oven until golden brown.
To assemble, lay about 1/4 cup of each greens, black beans and cooked sweet potato into each tortilla.  Drizzle with ranch, sour cream or Greek yogurt and enjoy!

Nutrition Facts: (for 1 taco) 284 Calories, 5g Fat, 48g Carbohydrates, 13g Protein, 10g Fiber, 51mg Sodium, 958mg Potassium

1.23.2016

Black Bean Soup

I had a different post planned for the first Lemon Pantry recipe of the year but with the Nor'Easter coming (or already here if you're further south) I thought a nice warm soup would be just perfect for a snowed in weekend.  I had a couple weeks off from blogging which I think was needed after a busy holiday season but I am happy to be back!  How are you all doing?!
This soup is my take on a classic that is so nice and filling but great for you.  It is low in fat and sodium yet high in fiber and a great vegetarian protein-packed meal! Plus, beans are a good source of magnesium and potassium.  I topped my soup with diced avocado and pico de gallo but you could serve it with sour cream or a few tortilla chips or even crumbled bacon if you're feeling frisky.  Best thing of all this tastes amazing and won't set your New Year's resolutions off just yet!  Have a great weekend everyone!


Black Bean Soup
Recipe by Ali Caron, RD
Serves 6-8

Ingredients:
2 Tbsp olive oil
1 red onion, chopped finely
2 large garlic cloves, minced
2 tsp cumin
2 cans black beans (do not drain)
1 cup vegetarian low sodium broth

Garnish: diced avocado and pico de gallo*

Directions: Heat olive oil and onion in a large soup pot over medium heat, stirring occasionally.  Add garlic cloves and cumin after a couple minutes and continue to stir until onions are translucent.  Pour in black beans and bring up to a simmer.   Remove 1-2 cups of soup with a ladle and puree in a food processor.   (Optional: Here I also scooped out most of the onions to puree to avoid having big chunks in the soup.)  Add pureed beans and broth to soup pot and bring back up to a simmer.  Dish into bowls, garnish and serve.

*For pico de gallo:  Finely dice onion and tomato and add a pinch of salt, a splash of lime juice and chopped fresh cilantro.  Mix and serve.

Nutrition Facts: 427 Calories, 5g Fat, 72g Carbohydrates, 25g Protein, 18g Fiber, 56mg Sodium, 1714mg Potassium

8.18.2015

Recipe Makeover: Rachel Ray's Tomato Soup

On weekends when I'm home (and this summer there haven't been many) I love to spend the morning on the couch watching Pioneer Woman, Giada at Home, Barefoot Contessa, etc. with my coffee and my dog.  This week Rachel Ray made five make-ahead meals including tomato soup and an incredible grilled cheese.  Suddenly, I was in the mood to make soup since it was rainy and just slightly cool (excited for Fall, anyone?  Bueller?).  I followed her soup recipe pretty closely however, I decided to skip some unnecessary sodium and chose to make it (almost) dairy free.
The result is a soup you can feel great about and if you decide to dunk in some grilled cheese sandwiches, go for it!  It saves you around 100 Calories per serving, cuts down on half of the fat and at less than 140mg Sodium per serving, it is a low sodium soup!  Let me know in the comments if you'd like to see more Recipe Makeovers in the future!  Happy cooking!


Low Sodium Tomato Soup
Recipe by Ali Caron, RD
Serves 8

Ingredients:
2 Tablespoons olive oil
1 cup onion, chopped (about 1/2 a large onion)
2 cloves garlic, chopped
1 teaspoon dried basil
1 Tablespoon smoked paprika
3 cups low sodium vegetable stock
2 tablespoons tomato paste
1 28 ounce can whole peeled tomatoes, no salt added
Salt and Pepper to taste
Chopped chives for garnish (optional)
1 cup non-fat Greek yogurt (optional)

Directions:
In a large soup pot, heat olive oil over medium heat.  Sauté onion, garlic, basil, paprika and salt and pepper for 10 minutes or until onions are soft.  Stir in tomato paste and deglaze the pan with one cup of vegetable stock.  Transfer to a food processor and add the tomatoes.  Process until smooth or desired consistency.  Pour the soup back into the pot and add the remaining vegetable stock.  Bring soup to a simmer on low heat.  Serve with chopped chives and a dollop of Greek yogurt.

Nutrition Facts: 90 Calories, 3.5g Fat, 10.5g Carbohydrates, 4.5g Protein, 3g Fiber, 88mg Sodium, 403mg Potassium

Note: This recipe is a Low Sodium food.  This recipe saves you around 100 Calories per serving and has half the fat than the original.  (Also, dairy free without the Greek yogurt topping.)

7.26.2015

Vegetarian Buffalo Chick Wrap

This recipe needs little introduction but I'll try.  It's a healthy yet mouthwatering twist on your typical buffalo chicken wrap!  I used these chick peas several ways last week including in a whole wheat wrap, on top of two lettuce leaves for a lettuce wrap, on a salad and as a side dish.  You really can't go wrong with buffalo sauce, can you?  I can't wait to make this recipe again and the best part is how fast and easy it was!  


Vegetarian Buffalo Chick Wrap
by Ali Caron, RD
Serves 4

Ingredients:
1 Tablespoon olive oil
1 medium shallot, chopped
1 can chick peas, drained and rinsed
1/2 cup buffalo sauce

Directions: Heat olive oil in large saute pan over medium heat.  Add shallots and cook for about 2 minutes.  Add in chick peas and buffalo sauce.  Stir occaisonally and cook for 5-10 minutes or until thickened slightly.  Add about 1/3-1/2 cup to a whole wheat wrap with lettuce, tomato and ranch dressing if desired or serve on a lettuce leaf, on top of a salad or serve as a side dish. 

Nutrition Facts: 166 Calories, 5g Fat, 26g Carbohydrates, 6g Protein, 5g Fiber, 509mg Sodium, 216mg Potassium